The inspiration for this wreath is super simple: I have a friend who loves to read. I was waiting for her to need a house-warming gift so I could make this. :) And then, on top of it all, she got a job as a reading intervention teacher! How perfect is that? Pretty flowers made of old book pages were invented for this moment, for real.
Bust out the hot glue gun, and you can attach anything to a classic vine wreath. The paper rosettes are super easy to make. You can find tutorials all over the web, like here or here.
Monday, December 12, 2011
Thursday, December 8, 2011
Scarf from an Old T-Shirt
I loved this red t-shirt. It was well worn and super soft, and even though the neck line was pretty stretched out, I wore it all the time. And then I got navy blue paint all across the front. It was completely ruined.
So I used this as an opportunity to make a brand new scarf. :)
I simply cut the shirt into strips, starting from the bottom (I removed the bottom hem first.) Then I cut one side seam out of each of these strips turning the t-shirt loops into long strips and stretched the strips out slowly. As you do this, the fabric rolls up on itself. I split what I had equally and braided the fabric loosely, tying off with a shorter extra strip.
Now my nice soft shirt is an equally soft and comfy scarf.
Friday, November 18, 2011
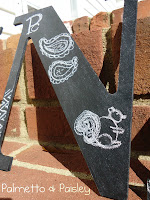
Chalkboard Initials
My sister needed some initials to personalize her dorm room, and I wanted to try something new. Chalkboard initials it is! If you'll forgive my less than outstanding chalk doodles, I think they turned out really well. (That is the beauty of chalkboard finish, though. Just wipe down, and redecorate.)
A word of advice to those who are experimenting with chalkboard finish: Try the spray paint variety for a smoother finish. I painted with a sponge brush and still had stroke marks.
Friday, November 11, 2011
Spare Grocery Bag Container
Still love Pinterest. I stumbled across this handy dandy tutorial on the pinboards. Some people in this world are far more clever than I, and lucky for me they post their genius ideas for the world to see. We have need for grocery bags everywhere in the house, namely because bedroom and bathroom trashcans need liners. I thought my mother was clever for rolling up extra grocery bags really tight and stuffing them in old Kleenex boxes, but this is a zillion times better. And cuter. I will be making one for the laundry room and the bathroom and the car.....
Monday, October 31, 2011
Ruffle Apron
I'm so excited about this because it's a big project for me. Proof that I can sew! Also, proof that you can make something awesome for barely any money. I was at JoAnn because I had coupons to use and came across their fabric quarters for $.99 a piece. I bought five with half a yard of muslin, and VIOLA! ruffle apron.
I wore it as part of my perfect 50s housewife Halloween costume this weekend, and definitely didn't get any pictures. It's a shame too because it was perfect for the outfit and really, really cute. But here it is! Hooray!
I wore it as part of my perfect 50s housewife Halloween costume this weekend, and definitely didn't get any pictures. It's a shame too because it was perfect for the outfit and really, really cute. But here it is! Hooray!
Wednesday, October 19, 2011
Ribbon Wreath!
I love Pinterest. It suits me very well because I'm not very imaginative. I execute crafts much better than I create them from scratch, so Pinterest, with all of it's already conveniently compiled beautiful craft ideas, is my new best friend. I was inspired to try this ribbon wreath when I came across a photo from She's Kinda Crafty.
The project supplies are pretty simple (which is what intrigued me):
1 straw wreath form
1 roll of extra wide white floral ribbon
6-8 rolls of ribbon of your choice
Scissors
Ruler
Sewing machine
Hot glue gun
Also, lots of patience.
I started by wrapping the straw wreath form with the extra wide floral ribbon. I have no picture of this because it was a messy ordeal. I'd never worked with a straw wreath before, and now I know.... until it's covered in ribbon, work with it outside. Straw goes everywhere.
Then I set to cutting my colored ribbon into 4.5" pieces. I used two 1.5" varieties, four 1" varieties, and a 5/8" ribbon that filled in any small holes on the finished wreath really well. I had 30-35 cuts of each ribbon.
Then each piece was sewed into a loop. I simply folded each ribbon in half and fed them through the sewing machine one after the other giving myself about 1/4" allowance to glue the loops to the wreath.
This is what they all looked like when I was finished. SO MUCH RIBBON!
It was almost sad to have to cut the loops apart.
The final step is gluing the ribbon loops to the wreath form. Simply part the ribbon below the stitched enclosure and put in a bead of hot glue (watch your fingers!). Glue ribbons to the wreath form in bunches. Spreading out and working all over the surface at one time will make for a lot of awkward little holes to fill in.
And after a little over three hours gluing ribbons to wreath, here's the final product. My Cavalier blue ribbon wreath! I hope you like it as much as I do. :)
Wednesday, October 12, 2011
Tutu Cute
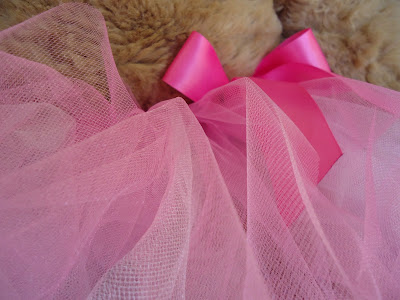
It's been a dreary few days in upstate South Carolina, so I decided to liven up my rainy day with a new project I hadn't tried before. I've seen pictures of adorable tulle tutus all over the internet, some simply homemade, others at boutique prices (some priced at over $75! Yikes!). I donned my rainboots and spent some quality time in the tulle section at my local HL, and then I set off to work creating my own sweet little play tutu. I'm very happy with the results. It took less tulle than I thought it would to achieve such a fluffy, full look. I think it'll be a perfect gift for my 3-year-old cousin.
If nothing else, it looks super cute on bear.
Subscribe to:
Comments (Atom)


